
Wilkat's Help Tips © 2001
Shim your guitar neck for better playing action:
Many times I've come across guitars with bolt on necks that cannot be adjusted (see truss rod adjustment tip) to obtain the low action that most guitar players are looking for. Here are a couple of solutions:
What's the real problem?1. Install a full shim in the body neck pocket 2. Install a partial shim in body neck pocket Before you attempt to shim the neck, you'll need to determine what the real problem is (and I assume that you've already correctly adjusted the neck's truss rod and bridge saddles), in order to shim it correctly. You may find that the action around and below the 12th fret is very high, but that playing open chords within the first 4 frets is fine (this is the most common problem). Still, you must check the action from the 12th fret to the 21st fret to determine if there is an additional problem. For example: If the clearance between the strings at the 21st fret is less than the gap at the 12th fret (check this using a feeler gauge, or a ruler as a guide). In this case, a flat shim plate installed in the neck pocket will not help a great deal, since once you depress the strings around the 12th fret, they'll likely bottom out on some of the frets closer to the bridge. There are a number of possible causes for this (e.g. tapered neck pocket, tapered heel on the neck, raised frets, or raised fingerboard). Conversely, the gap at the 21st fret may be considerably greater than at the 12th fret, which on occasion, may not pose a problem when a shim of uniform thickness is installed in the pocket. If it does, then the shim will have to be done in such a manner as to elevate the neck's heel at the bridge end, higher than at the open end of the pocket.
What works best?:
Types of Shims: I favour the full pocket shim if the variation is greater than 1/32" (0.03"), which is about 0.80 mm for those of you who favour the metric system. Mind you, usually a very thin shim is all that is required, since the difference required is often small (from 0.005" to 0.010"), and the angle of the neck can vary considerably over the length from the nut to the heel (remember the trigonometry you learned in high school?).
NOTE: A piece of paper is normally around 0.004 to 0.005" thick, whereas a razor blade can vary in thickness from 0.004 to 0.010" , depending on the type selected. A matchbook cover has a thickness of about 0.012". It's best have a vernier caliper available to check thickness with (if you can't afford to buy, borrow one). There are low cost plastic ones available now that will suffice.A host of items can be used to fashion a shim, and many of them will work. The rule of thumb is that a harder material will work better, so you may want to try a razor blade, a thin piece of hardwood, or a thin section of hard plastic once you've determined the thickness you need. Start off using a rectangular piece of a matchbook cover placed at one end of the neck pocket (perpendicular to the neck), to see what results. Oftentimes this may prove satisfactory, and you'll happily keep on playing. Remember that the matchbook cover will compress between the wood, so the actual thickness adjustment will normally be less than the initial thickness. A harder material can compress the wood, so thicker shims are best when they cover the entire pocket (of course you'll need to drill holes through it for the neck screws). Another nifty trick is to use a piece of an insect screen, which will also prevent the neck from shifting in the pocket once it's screwed on. This can be a real bonus if your neck pocket is not a tight fit with the neck.Trial and error is often employed to find the right shim thickness, or to determine which end of the pocket to place it at. Be prepared to remove the neck a few times before you're satisfied with the outcome.
Making a full pocket shim: Full pocket shims are best made from a scrap piece of thin hardwood. You can use other materials, but hardwood is simpler to work with than plastic or metal.
Start off by making a thin cardboard template using an old notebook cover or the thin cardboard frequently found in new shirt packaging. Trace around the heel of the neck, cut out the shape, test fit it into the neck pocket and trim the end to suit. Mark the hole locations for the neck screws, as you'll need to drill holes in the shim to match the pocket. Have the grain of the hardwood run in the same direction as the strings (this will prevent the the thinnest tapered end from cracking off). Drill the holes after you've cut the shape of the pocket from the hardwood and test fitted it into the pocket. Next, mount the hardwood shim onto another scrape piece of wood using two-sided sticky tape.
WARNING:Wear safety glasses when ever operating any power tool ! Don't take chances with your eyesight -- it's not worth the risk ! The use of heavy leather gloves is recommended to protect your hands when using power sanders.
Shape the shim on a belt sander using the mounting board as a holder to keep your "gloved" fingers safely away from the sanding belt. (see Figure No. 1).
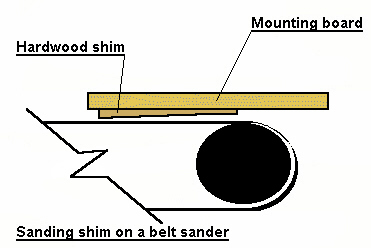
Figure No. 1
Using this method, you can taper the shim quite easily, and thin it down to virtually zero at one end. You need to be careful to prevent the sides from being different in thickness by holding the mounting board level from side to side, while you gradually lower it from end to end. Once you're ready to remove it from the mounting board, it may be necessary to heat it a bit using a hairdryer, (as the two sided tape creates a fairly strong bond), and gently pry it off with a thin scraper, starting at the thick end, and slowly working your way along. This technique is also good for a level shim, if you don't require the taper.Some Final Comments:
It's quite possible that after shimming the neck you will have to readjust your truss rod to get the best action, so be prepared to do this. In addition, you may also need to readjust your bridge posts or saddles -- sorry, but this is all part of the process to getting your axe to play its' best !!!
Also, some guitarists don't want to use a shim, and it may be possible to avoid using one, depending on which way the neck needs to be adjusted. Occasionally the neck pocket can be routed out slightly to create a taper from the bridge side towards the head stock, which will result in the neck tilting back (similar to how a Les Paul's neck is set into the body). This won't work if your neck needs to tilt up towards the body, or if raising the neck heel cannot be avoided. Consult your local repairman for this possibility, he should be able to tell you if it can be done, and quote you a price (I don't recommend trying this at home -- this sort of modification requires a skilled luthier !!!).
Now settle back, burn those notes, make your strings scream, and enjoy those lightning fast pull-offs and hammer downs you couldn't get happening before !