Wilkat's Help Tips © 2001The fret ends on my guitar and bass are sharp and reduce playing comfort -- how do I fix these?
Often factory produced guitars or basses suffer from attention to detail, resulting in annoying things like sharp fret ends. Sadly, I've seen this sort of thing on a number of well respected brands too! Ironically, you'll also run across lower - end guitars with well finished frets. So lets look at what needs to be done:
Examine the ends carefully to determine if the frets are lifting:
If the fret ends are not fully seated against the fingerboard or lifting, they may need to be pressed (or tapped) down, or in the worst case: clamped and glued.
NOTE: Consult a skilled luthier if you are not confident in your ability to assess ,replace, or repair your instrument's frets. This is fine work requiring a steady hand and a good eye (as well as considerable patience), and may be risky for inexperienced individuals.Before resorting to gluing, you may be able to tap the loose / raised fret end back down into place. You'll need to remove all the strings, and if it's a bolt - on neck, you'll find it easier to work on with the neck removed from the body. You will need a hammer (yes, a hammer!), and if you don't have the kind with softer buffer ends, that's okay, but you'll need to use a buffer piece between the hammer's head and the fret (you won't be happy if you dent the fret!). It's always a good idea to mask off the fingerboard between the frets before you attempt any kind of work to the frets, so do this now, prior to swearing about it later!WARNING: Working with modern adhesives can be dangerous. Do not attempt to glue down a loose fret end without respecting the adhesive manufacturer's recommended precautionary steps, as well as those noted in this article.
I've found that a piece of flexible, durable nylon, or other resilient plastic, works quite well as a buffer. It should have a thickness of no less than 3/32". Alternatively, a piece of softer metal (like brass) can do the trick. With this buffer held against the fret, and with the neck supported from underneath ( a radiused protective neck caul works best), and clamped down to your workbench, begin tapping the raised fret end, using a firm rap ( don't bash down on it like you're driving in a nail ! ). Lift off the buffer material and check your progress. It usually doesn't take to much effort to get it to re-seat. However, if the fret tangs aren't gripping, or there is too much spring in the fret itself, it may not hold, and gluing (or replacing the fret) may be necessary. Sometimes, the entire fret may have to be tapped (end to end) to get it to re-seat.
Honestly, if all the fret ends are lifting, I'd recommend a fret job. If you're only dealing with a few, gluing will make sense (just be sure to tell your repair man about it if you ever decide to get the frets replaced by somebody else! He'll need to know this to prevent or minimize any damage to the fingerboard during fret removal!).
The trick to gluing a fret end down, is to get the adhesive into the thin fret slot. This can be done using a syringe, or a thin plastic dropper (they do make special ones for fine work). Alternatively, I have successfully used a needle dipped into the adhesive and gently coaxed into the slot. If you're going to attempt gluing a fret end, carefully remove the masking tape, and apply wax (or petroleum jelly) to the fingerboard along each side of the fret slot (be careful not to get any wax or jelly onto the fret or into the fret slot !). Using one of the readily available fast bonding super glues on the market, apply the adhesive carefully into the fret slot and clamp it down (you'll have to do this quickly before the glue sets, and occasionally your finger will serve well as the method of pressing down the fret -- just be careful not to bond your finger to the fret !!!!). Clean off the wax or jelly using a soft rag and naphtha ( if necessary, you may have to use #0000 fine steel wool, which works well to clean fingerboards, and frets -- Don't use the steel wool if you have a lacquered maple fingerboard or you'll scratch it up! ). This is also a good time to re-oil your fingerboard, so you might as well do it while the neck is off the body!
My frets aren't lifting, they're just sharp on the ends:
Assuming you have a small fine round file, or a small fine triangular file, this can be resolved by filing. If you plan to use the triangular file, you'll need to round off at least one of the corners by grinding or sanding off the sharp edge. A bench type belt sander does this quite quickly, but you'll need to hold the file securely, and follow all safety precautions (like wearing safety goggles). SEE FIGURE No. 1
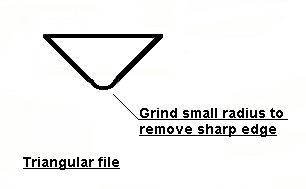
Figure No. 1
With the fingerboard taped off as described earlier, gently file down across the corners of the frets, using a curved downward stroke towards the center of the fret. Repeat this procedure on each side. If you choose to use the round cross section file, you need to rotate the file between your fingers with a twisting motion. SEE FIGURE No. 2
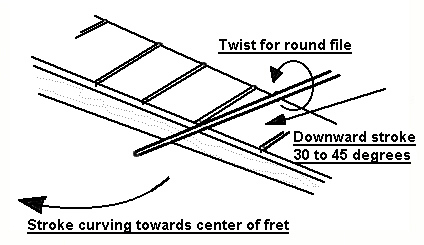
Figure No. 2
Obviously if you're using the triangular file you won't be trying to twist it, but the stroke downward and towards the center of the fret will be much the same. You may have to modify the angle a bit as you go, and the rounded edge of the file will ride over the taped off fingerboard to prevent damage to the fingerboard wood. Don't press down firmly as you do this, simply slide the file across the edge with gentle pressure in the direction of your curved downward stroke. Repeat on all edges, and change the masking tape if you wear through it anywhere.Once you've completed filing, a fine sanding is required. After you've carefully peeled and removed the masking tape, clean the edges with a soft cloth moistened with naphtha. Run a strip of masking tape along the edges of the neck below the fingerboard, and using a fine 1500 grit sand paper, lightly sand the edges along the full length of the neck on each side. Wipe and clean using naphtha and cloth. If you have a maple neck without a fingerboard, tape as close to the bottom of the fret tangs as you can before sanding, and use great care not to sand through the lacquer. It doesn't take much time or pressure to get this stage completed.
NOTE: You can file the ends to a rounded form, or simply take off the sharp corners for a squared end-- how far you go, depends on the look and feel that you like. See below.
Well, this should do the trick, and I hope you enjoyed fixing these nasty little fret ends.