
Wilkat's Help Tips © 2001Repairs to high gloss finishes (or just how gutsy are you?):
No I'm not trying to scare you! But....repairing scratches, chips, and dents in a high gloss guitar or bass finish is not something to take lightly. I say this because there are a number of things that can go wrong, and there is a real learning curve that involves trial and error. So, the first thing to decide is do you have the confidence necessary to proceed? Well let's start by asking a few questions:
1.) Are you a handy type of individual? Are you good at fixing things in general? 2.) Are you good at following instructions? Are you the type who reads the manual before trying to assemble something you just purchased? Be honest with your self -- it's important to know your limitations or weaknesses. 3.) Are you ready to try again if things don't work out the way you want the first time? 4.) Do you have a reasonable workshop or space to work on this type of discipline? 5.) Do you have a lot of patience?
If you answered yes to most of these question (particularly 1 and 2), then read on -- if not, better take your prized possession to a professional (I'm not kidding!!!!).What's your objective?
If you're looking to strip and re-finish your entire guitar body, I won't be covering that in this article (look for tips on that in the future). What were going to discuss here, is the most common dings and scratches that seem to plague us all -- the ones we've done ourselves through careless handling, or by some moron trying out your baby when you back's turned. Also, if your finish is not a clear top coat (i.e. if it's a tinted or solid colour lacquer), these instructions will be of little use. Solid colour lacquer, or tinted top coats are complex to work on, as damaged areas must be filled using a matching lacquer, and this takes a great amount of experience and skill. Very minor chips can sometimes be successfully filled with a matching solid coloured acrylic lacquer (like the type available for use on automobiles), but we are not covering that here.
Let's get started:
Minor Scratches: Yep, they're the most common, and sometimes the most difficult to repair, depending on their nature. Minor ones can usually be rectified with a soft rag and a quality fine rubbing compound (and plenty of elbow grease -- get used to this well-used term, you're gonna need a lot of it, unless you've got access to a professional luthier's polishing wheel). That's right, we use powered polishing wheels (and different types of abrasive polishing compounds) whenever we can, and these things don't come cheap! You can use hand held drills and the like, fitted with buffing pads as these can do a good job. However, they can burn through the finish, and some of the pads are made of poor quality synthetic materials. If you go this route, pay for the good stuff and shy away from "dollar store" supplies. And, remember, you'll still need to finish some parts with that good old elbow grease, regardless.
NOTE: You will need to purchase wet / dry sandpaper for some repairs but don't start using these right away on minor scratches -- especially on the larger flatter surfaces of the body which can be difficult to blend and rub out. Start with the rubbing compounds (the finer the better when you start off). Some of the guitar polishes on the market actually contain very fine abrasives which act to clean and polish at the same time, so these would be a good place to start. Fine polishing compounds can be obtain at auto supply houses or body shops -- make sure you get the really fine type for high gloss polishing -- some of the coarser ones will scratch the surface worse than when you started. Avoid using any product that contains silicone (Again, I'm not kidding!!!!), as these will cause you considerable grief when trying to apply any kind of lacquer later on.What kind of finish is on your instrument?The first tip on very minor scratches was the easy part, and the type of finish isn't very critical when doing touch ups to these. However, it's a different ball game when the scratches are deep enough to require filling, as compatibility is always a concern. You can attempt to fill a deeper scratch using the the same product as the instrument has on it, but then you should find out what it is, and that's not always easy. Fortunately, numerous manufacturers (e.g. Fender and Gibson) have used nitrocellulous lacquer over the years, as well as polyurethane and polyester finishes, and that's what we'll focus on. If you've got a "French Polish" or real old style shellac varnish finish, take your axe to an experienced professional, and skip this article.
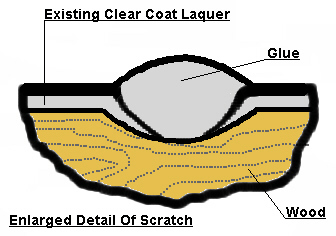
The simple solution that works on most finishes, is filling with one of the super glues available. These cyanocrylate adhesives are sold under a variety of brand names and are available in different viscosity's (thin and thick), and are fairly easy to apply (although you need to heed the manufacturer's warnings carefully as they can easily bond your fingertips and other areas of exposed skin, and you should wear safety glasses when working with these types of products too!)Deeper Scratches:For deeper scratches in "clear coat" finishes that won't rub out with a compound, and where the wood underneath is not exposed, you can apply a cyanocrylate glue into the scratch and just slightly beyond the ends of the scratch. Since you usually won't need much glue to fill the scratch, it's often easier to apply using a fine tip like a tooth pick (use the round kind with the sharp pointy ends) . There are also special thin plastic tubes available for this purpose, (some which can be used to siphon up the glue from the bottle, and then when gently squeezed, release a carefully measured amount like a dropper). It's important to note that these adhesives (unlike lacquer), will form a mound that is higher than the surface you are filling (see Figure No. 1). This means they will need plenty of drying time before you can work them down by filing or sanding. If the scratch is really deep, you may need to apply a second coat, but that's not normally the case. You will have to support the instrument in a manner to prevent the glue from running and causing drips that can create more work for you. There are accelerators you can buy to speed up the drying time of the glue. Use these only if you really need to since the glue will harden rapidly, and tend to become a bit hazy (we want it to be clear so it wont show afterwards).
Figure No. 1
SUPPLIES: You will need:NOTE: It's best to start off with a repair on the edge of the guitar or bass body -- particularly in a spot that that has no sharp edges. If you work on an area in the larger flat surface, it is extremely difficult to blend and polish out the repair to match. It takes a lot of polishing and even then it may show. The way to resolve this is to re-work the rest of the surface as well (usually this means fine wet sanding and polishing the entire body). Remember, I asked you if you had a lot of patience? Wisdom suggests that you practice on an old "non-prized" guitar before you tackle your beloved instrument. Practicing on a "garage sale special" that you can live without is the best advice I can give you. One you've experienced what can go wrong (remember trial and error?), you'll be better poised to handle things.1. Clear cyanocrylate adhesive (Crazy Glue, Loctite, Hot Stuff are common brands) 2. Toothpicks (with sharp pointy ends) 3. Small fine file (diamond nail file, or other small fine tooth flat file) 4. Wet / dry sandpaper (No 600 and 1500 grit) 5. Sanding block (rubber or cork work best, use wood as an alternative) 6. Water pail (a large plastic margarine container can suffice) 7. Naphtha (for cleaning) 8. Clean soft rags (flannel or similar works well, old soft cotton tee shirts are pretty good too) 9. A handheld drill and buffing pad (unless you plan to rub only by hand) 10. Rubbing compounds ( a medium and a very fine polishing compound are required) Step 1: Thoroughly clean the instrument using naphtha, and wipe again with a clean dry rag to remove any haze.
Step 2: Apply the glue using a toothpick to guide it into the scratch.
Step 3: Let it dry for 1 to 2 days.
NOTE: If the glue is well hardened, it is often possible to use a sharp scraper to level it off with the existing surface, followed by wet sanding for final blending. A sharp safety razor blade can also work well. If you use a blade, tape off both ends with masking tape, leaving only the center area exposed to contact the raised surface of the glue.
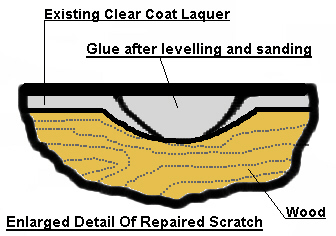
Figure No. 2
Step 4: Carefully file and level off the raised surface of the glue and start blending it into the existing finish.Step 5: With the #600 paper that has been soaking in water overnight, begin sanding to level further.
Step 6: With the #1500 paper (again soaked in water overnight), continue blending further.
NOTE: The surface should have a dull even patina when fully blended and leveled. If there are any shiny spots, they are generally lower than the main surface, and you either need to sand further, or apply a little more glue, and repeat the leveling process by sanding some more. Use the wet sandpapers wrapped over a sanding block where practical (and for flat surfaces). A circular sanding motion usually works best. Rinse out your sandpaper frequently, and wipe the surface often to inspect your progress. Use a light touch, and exercise caution to avoid sanding completely through the finish -- especially on sharper corners and edges!Moisten the buffing pad with water, and keep it moving -- if you stay in one place too long, you can actually burn through the finish. Apply the polishing compounds using a damp rag, then polish with buffing action.
Step 7: Begin polishing out the area with the medium rubbing compound.Step 8: Polish again using the very fine rubbing compound.
Deep Scratches with Exposed Wood: For areas with exposed wood, you may need to add some colour back prior to filling in the scratch. This can tricky since you're trying to match a colour that will darken somewhat once you've applied the filler (in this case our cyanocrylate adhesive). A solution that can work quite well, is the use of coloured marker pens (preferably the permanent kind). Sometimes water soluble types will work, but again, this is why you need to test it out before using it. If you don't have and old guitar to practice on, at least find a scrap piece of wood to conduct a trial. You'll want to compare the colour to your instrument after you've applied the glue, sanded it, and polished it. You can also use stains if appropriate, and if you can find or mix the colour you need. These are available in both liquid and powdered form, but they will not mix with the cyanocrylate adhesive. Make sure the stain or marker colour is dry before you apply any glue over it.
Once you are satisfied with the colour to add to the wood, you can proceed with the steps noted above. If the existing finish is relatively thick, the scratch may be deep enough to require more than one application of glue to build up the surface for future leveling. You can use use a fine liner brush to apply the glue into the scratch, but be prepared to throw out the brush afterwards.Chips: These can be resolved using the same methods described above, although in some cases you may wish to use one of the thicker cyanocrylate adhesives. This is especially helpful if the chip is on a radius corner (aren't they usually?), to minimize the chance of drips or runs. However, if the wood is dented, you may want to try and bring it back up. This can be achieved by steaming it to swell the fibers back up. Although I would recommend this technique if the dented area is very small and the existing lacquer finish is too close to it. A larger chip with a dent in the middle of it can often be raised by using the following method:
Step A: Moisten the area with a damp rag
Step B: Using the damp rag against the wood, apply the tip of a soldering iron to the rag over the dent. Be careful not to burn through, you just want to heat it a bit to steam out the fibers. Move the rag frequently to check your progress.
Step C: Allow the wood to dry thoroughly before proceeding.
Dented finish with cracked edges: You may have a condition like this where the lacquer has not fallen out (or only partially chipped out, leaving some material crushed in place. It is best to remove the broken pieces before attempting to fill these in these areas. If you don't, the cracks and dent will remain very visible, and you wont be pleased. Carefully pry out the pieces of cracked lacquer using a hobby knife like an Exacto blade.
Chips on a sharp edge: These are a bit tricky, but not impossible. You'll need to build up the area with adhesive and prevent it from running. Apply a strip of masking tape along the edge of the damaged area, then apply the glue. Allow it to dry for 1 to 2 days, then remove the tape. Now you're ready to start leveling it off, etc.
Some Closing Comments:
I cannot stress enough the importance of practicing before you tackle the real touch up job. Even a scrap table leg, anything you can get your hands on to simulate the repair you want to conduct, is useful.
You can use actual lacquer in place of cyanocrylate adhesives to repair damage, but it is more difficult to work with, and you should use the identical lacquer that is already on the instrument.